20:50
Well hello hello! It is September and it does mean... the 31 days challenge! Yes, I am participating in this cray cray everyday nail ...
Well hello hello!
It is September and it does mean... the 31 days challenge! Yes, I am participating in this cray cray everyday nail art challenge! If you don't already know, it is a challenge that lasts for a month long with prompts that allow you to go with the theme however you want to interpret it. See the list at the end of the post!
Without further ado, let me share with you, my very first successful, one-stroke nail art!!! OMG girls, you have no idea how happy I was when the brush turned to my favour hehe! This one-stroke technique I would consider it advanced, and I would count myself very lucky when I did this. I tried it before, but failed miserably. So happy I managed to do it :D
Oh, I forgot to mention that today's prompt is red nails! So I went ahead and applied two nice coats of China Glaze "Adventure Red-y" which is a sophisticated deep red (swatches here) on my pointer and baby fingers.
Then on my middle and ring fingers, I had on two coats of Sinful Colors "Snow Me White" and let it dry completely. I should've matte the white base for easier one-stroke painting but I totally forgot.
Anyway, using a flat brush, I dipped one corner into dark red acrylic paint and the other in white acrylic paint. Then I created the petals by turning and twisting the brush to get the one-stroke effect.
I was am fairly into matte right now so I decided to try on this manicure with a matte look using Revlon "Matte Top Coat". I'm thinking to go for all matte finish for this whole challenge, what do you think?
Here's the macro shots of the flowers, pretty eh in matte?
I also used black acrylic paint mixed in with some white to lighten it a bit, and outlined messily around the flowers and add some dots near the centers of the flowers.
These are the prompts that are coming up! This was taken from
Chalkboard Nails :)
If you'd like to see what I did for last year's 31 days challenge, click
here!!

| Facebook |
Instagram |
Twitter |
Tumblr |
Pinterest |
NailPolis |
Bloglovin' |
Reddit |
21:35
Whoop whoop! Here's by far my most favourite nail look from all the Stamping Saturdays that I've done *grins* First off I had o...
Whoop whoop! Here's by far my most favourite nail look from all the Stamping Saturdays that I've done *grins*
First off I had one coat of Barry M "Spring Green". Then I created a gradient/ombre using a damp cosmetic sponge with Sinful Colors "Snow Me White" and Barry M "Spring Green". I tried to concentrate the white near the tips of my nails.
Then I added a top coat to blend the colors and prep it for stamping. After letting it dry for 15 minutes, I stamped on a floral pattern image using
BP68 stamping plate from BornPrettyStore.com and Konad's White stamping polish.
So the image blends into the white tips which I think was pretty cool! I really did love this look very much :D
Here's my humble macro shot for viewing pleasure *winks*
I feel that this mani is rather easy to recreate and you should really try it out with different colors and stamping images, share it with me if you do try them out :)
Here's what the other stamp ladies have done:
| Facebook |
Instagram |
Twitter |
Tumblr |
Pinterest |
NailPolis |
Bloglovin' |
Reddit |
10:58
Yay, it's the weekends! I have pretty much completed half of my tests, two more exams and I am done with tertiary education!! So, ...
Yay, it's the weekends!
I have pretty much completed half of my tests, two more exams and I am done with tertiary education!! So, for this week, I have for you a very soft and light manicure. I chose to stamp using Revlon "Moonlit Woods" which is from the Parfumerie line which are scented polishes,
You can see how delicate the manicure turned out despite the rather tribal prints from
BP55 stamping plate that I used. I was quite pleased that the image did transfer pretty well despite it being normal nail polish, plus a scented one!
For you to see more clearly how the image stamped, I darken the image a tad!
I keep using my BornPrettyStore plates that I purchased a long while ago for #StampingSaturday ooops :P I might very well run out of stamping plates to continue this LOL, so should I go buy some hehehe!
Anyway, do take a look at the nail artists' work below!
| Facebook |
Instagram |
Twitter |
Tumblr |
Pinterest |
NailPolis |
Bloglovin' |
Reddit |
17:50
Hello hello! Today I have ventured out of my norms to create this manicure. I had on a base color of Jior Couture - I Can Azure You It...
Hello hello!
Today I have ventured out of my norms to create this manicure. I had on a base color of Jior Couture - I Can Azure You It's Fall (
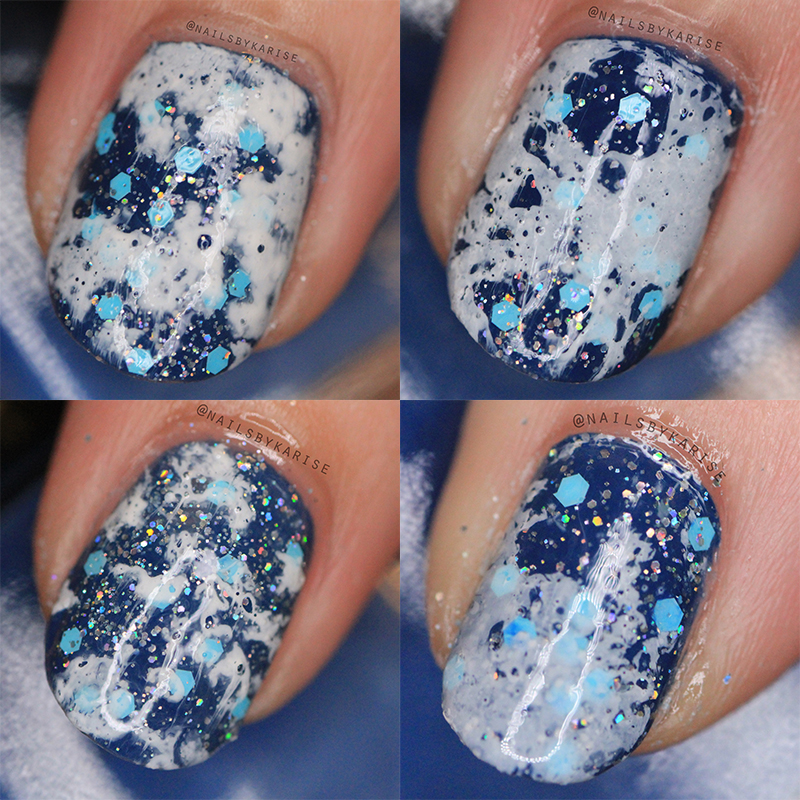
reviewed here) and then one coat of NCLA - Enchanted City, a beautiful holographic glitter with medium turquoise hex pieces. Lovely combination!
Anyway, I initially I wanted to do a water marble with a clear polish to see the background through, but sadly that didn't work out... So I tried the spray method.
What I did was drop white polish into my water (like how you would marble) and then use a perfume and spray it onto the surface of the polish and that breaks it apart in abstract patterns that looks amazing. Then I dip my nail in (like how you would when marbling).
IT TURNED OUT SO GOOOOOD! I am so impressed and happy with the result! Because the glitters can be seen through and the whole manicure looks so abstract-y! What do you think? Take a closer look at the macro shot collage below :D
| Facebook | Instagram | Twitter | Tumblr | Pinterest | NailPolis | Bloglovin' | Reddit |
18:50
item was sent for review Hello there again! Today I have some stamping for you guys! It was been a while since I last stamped!! I a...
item was sent for review
Hello there again!
For the base for this mani, I used the seran wrap or cling wrap technique. I had one coat of dry polish on my nails to begin with. I then tried to blob on Sinful Colors - Cool Gray and Vacation Time and then using the wrap to mix the colors together. I found this method to be not very successful.
I found out that it is better to blob the polishes on the wrap and mixing it by pressing onto one another, than transferring to the nail. That way, there will not have any white base spaces showing through the colors.
I then added a top coat and waited a good 15 minutes. Then I stamped on the designs from the plate. Here I have shown you four of the nine designs available. The plate only costs USD$1.59 and there's free shipping worldwide, so as I always say products from
BPS are just worth it!
| Facebook |
Instagram |
Twitter |
Tumblr |
Pinterest |
NailPolis |
Bloglovin' |
Reddit |
11:41
I have another swatch of a purple polish from my Sinful Colors collection :-) Here is Verbena, the name reminds me of Ribena which has a pu...
I have another swatch of a purple polish from my Sinful Colors collection :-) Here is Verbena, the name reminds me of Ribena which has a purple coloured syrup LOL.
The polish is quite opaque, swatched with two coats. I had a hard time getting the best lighting to show the true color of the purple to give it justice. In the end, I used flash to get the best results.
Anyway, I love Sinful Colors' brush, its not as wide as OPI neither too thin like China Glaze. Here's the video:
19:34
I decided to do this very simple mani using Revlon - Trendy with Sinful Colors - Nail Junkie as an accent nail. I realised that the glitter...
I decided to do this very simple mani using Revlon - Trendy with Sinful Colors - Nail Junkie as an accent nail. I realised that the glitter goes really well with the colors!
18:48
Hey there! I've got a huge haul of Sinful Colors nail polishes! And this is one of them only. Cause I wanted to do a Chevron nail art (...
Hey there! I've got a huge haul of Sinful Colors nail polishes! And this is one of them only. Cause I wanted to do a Chevron nail art (as seen previous post) I decided to use this new color, Be Happy. This color totally describes me so well and it is a pretty pretty color!
It may seem like it Essence - That's what I mint. However, this color is definitely more blue!